


Got questions?
Broadband FAQs
- Log-in to Hathway Self Care Portal on www.hathway.com
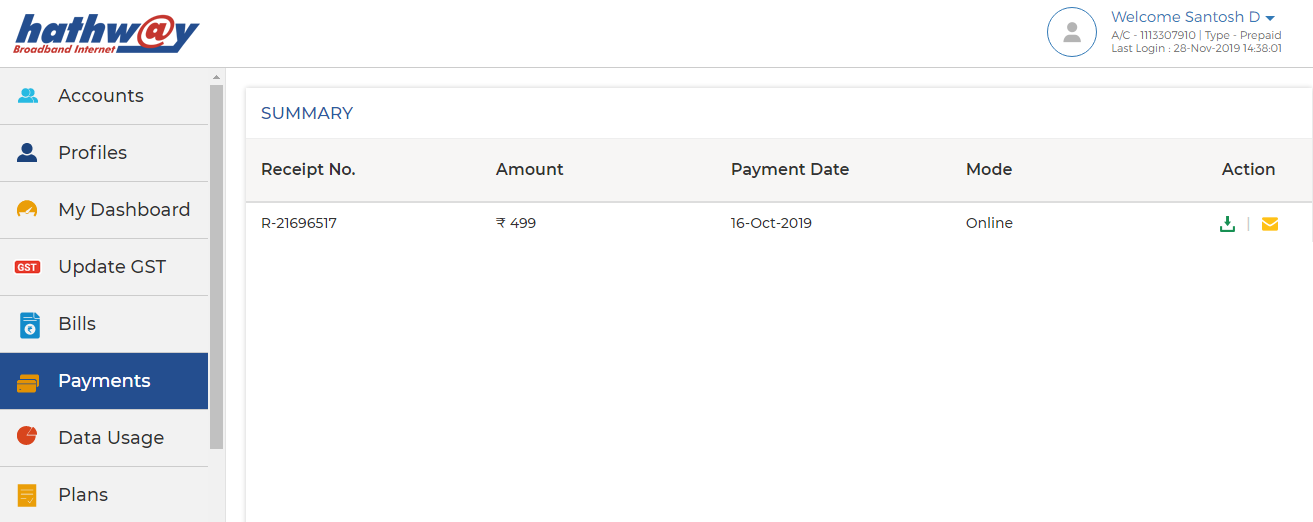
- Click on “Payments” tab on the Left Menu Bar .
- Check whether your Payment is reflecting .
- Online Payments usually get updated within 30 mins to 4 hrs. depending on the Bank / Payment Gateway . Payment thru Cash or Cheque takes 12 hrs. to 24 hrs. to get updated
- If your Payment is not reflecting then wait for the same to be updated
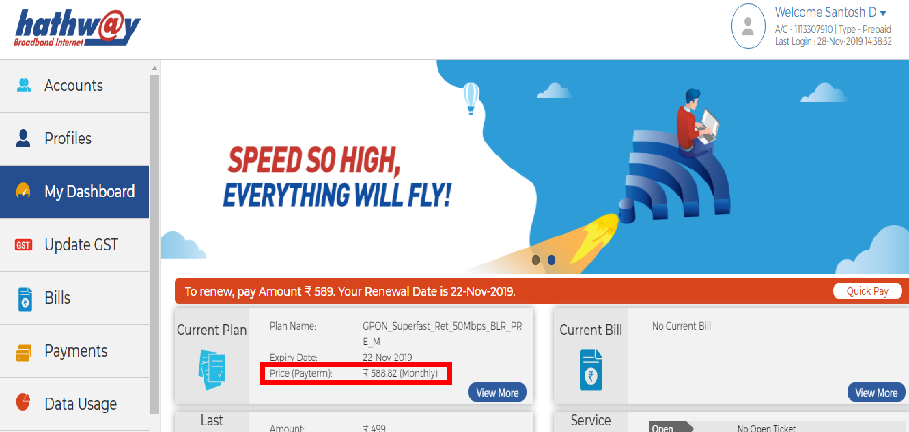
- If your Payment is updated then go to “My Dashboard” on the Left Menu Bar .
- Check the Renewal Amount under “ Current Plan”.
- If the amount you have paid is same as your Renewal Amount , your account will get auto activated within 30 mins.
- If the amount paid by you is different you may need to pay the differential amount to get your account activated
- Log-in to Hathway Self Care Portal on www.hathway.com
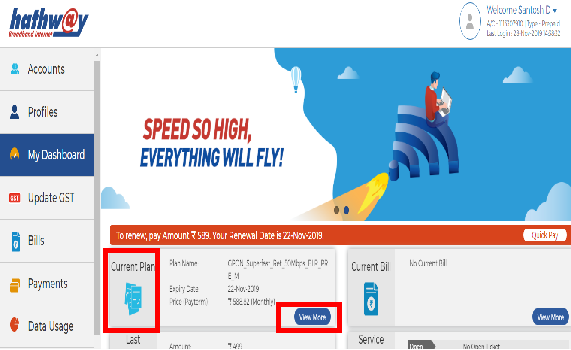
- Go to “My Dashboard” in the Left Menu Bar .
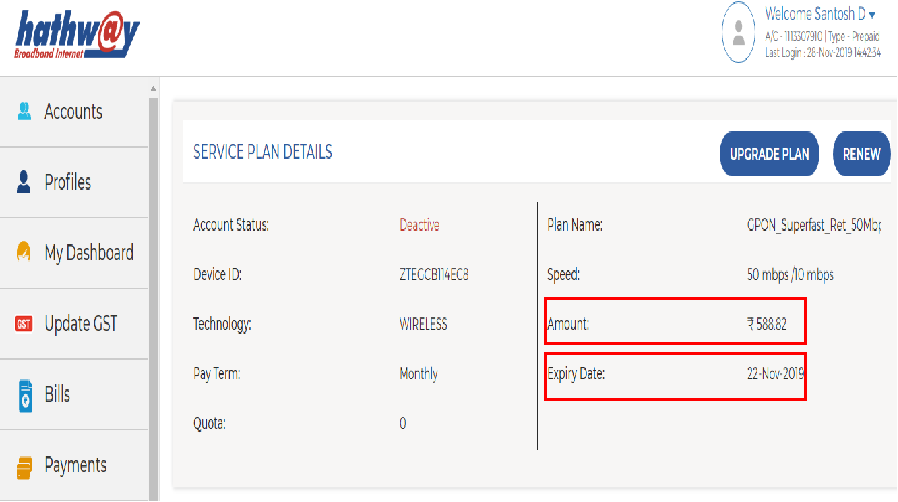
- Click on “View More” under “ Current Plan”
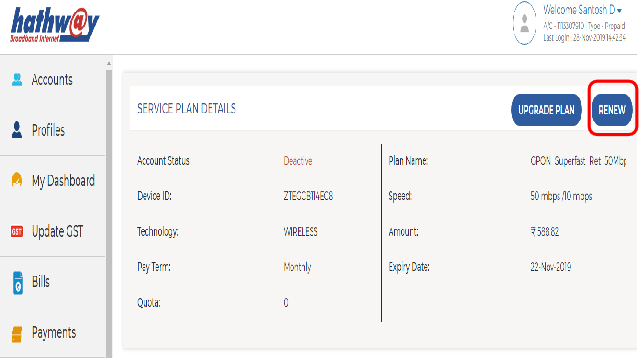
- You will get the Renewal Amount and Your Plan Expiry Date under “SERVICE PLAN DETAILS”

- Log-in to Hathway Self Care Portal on www.hathway.com
- Go to “My Dashboard” in the Left Menu Bar .
- Click on “View More” under “ Current Plan
- Click on “RENEW” option on the Top left hand corner
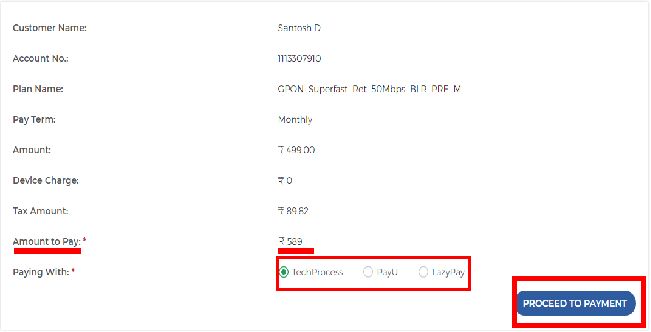
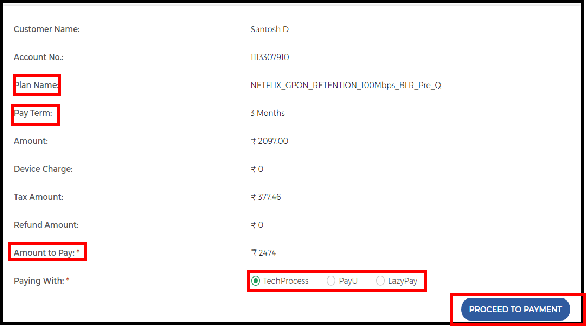
- Check the Total Renewal Amount .
- Select your preferred Payment Gateway.
- Click on “PROCEED TO PAYMENT”
- You will be redirected to the Payment Page.
- Log-in to Hathway Self Care Portal on www.hathway.com
- Go to “My Dashboard” in the Left Menu Bar .
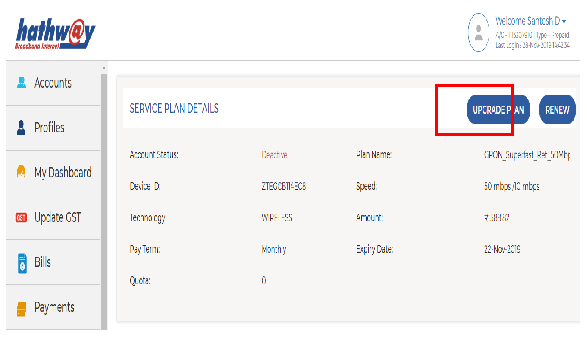
- Click on “View More” under “ Current Plan
- Click on “UPGRADE” option on the Top left hand corner
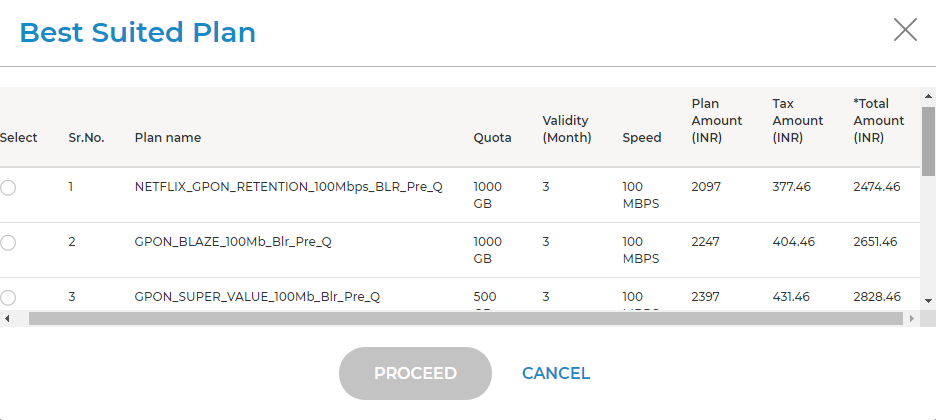
- You will get the Best Suited Plan towards upgrading your Account .
- Select your preferred plan and click on Proceed.
- Check the Total Renewal Amount
- Select your preferred Payment Gateway.
- Click on “PROCEED TO PAYMENT”
- You will be redirected to the Payment Page.

- Log-in to Hathway Self Care Portal on www.hathway.com
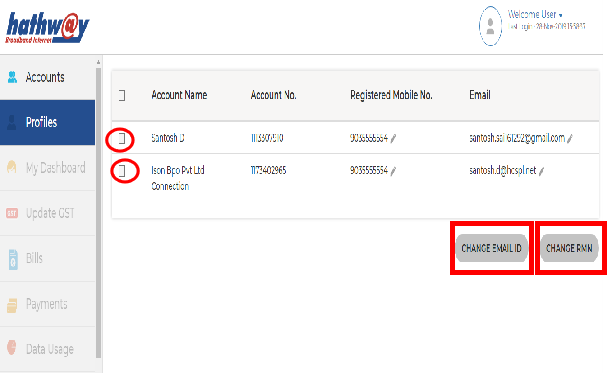
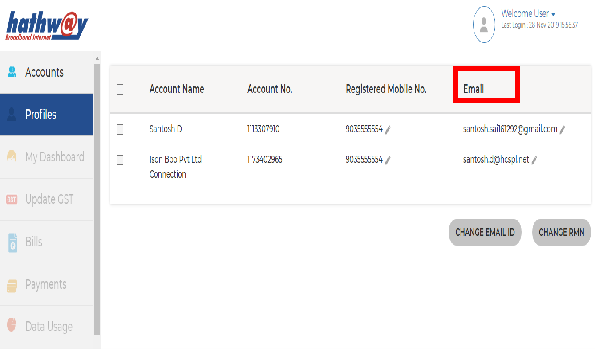
- Go to “Profiles” in the Left Menu Bar .
- You will get your Account Details showing your Registered Mobile No and Email Id.
- If you are having multiple Accounts with the same credentials then select the Account for which you wish to change the details .
- Click on the “Pen” symbol to update the new details.
- Click on the correct option from the bottom of the page to save your data .
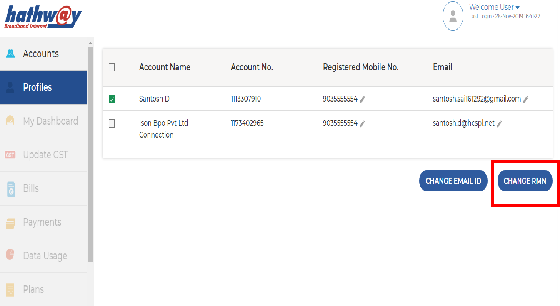
- Click on the “ Change RMN” at the bottom.
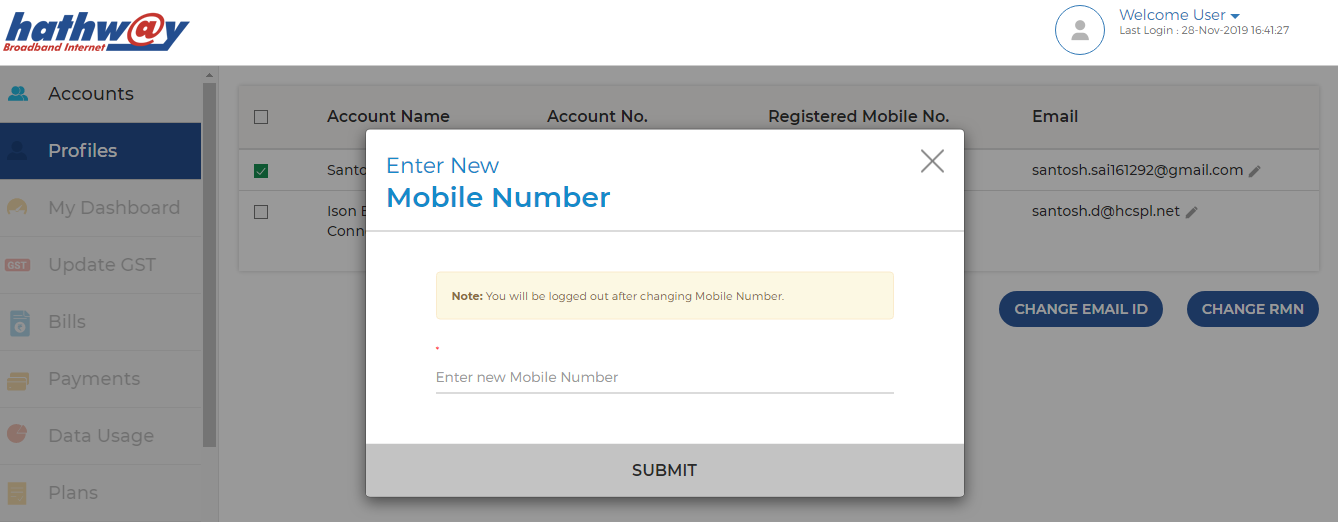
- Enter your new Mobile No.
- Enter the OTP sent to your new Mobile No.
- Re-Login with your new credentials
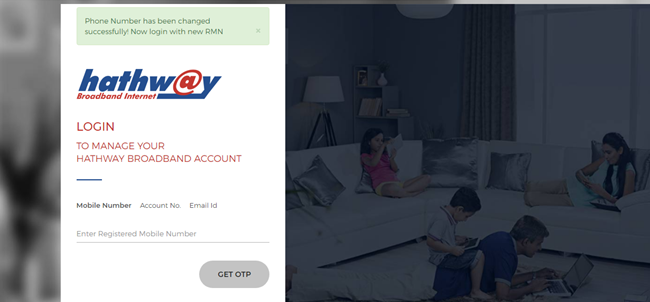
- Log-in to Hathway Self Care Portal on www.hathway.com
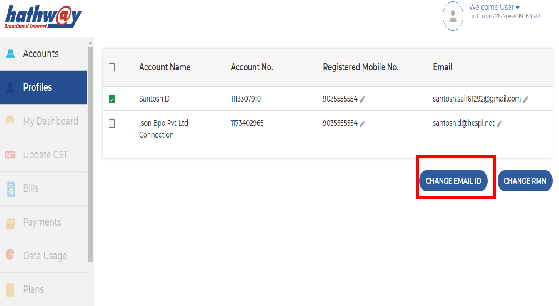
- Go to “Profiles” in the Left Menu Bar .
- You will get your Account Details showing your Registered Mobile No and Email Id.
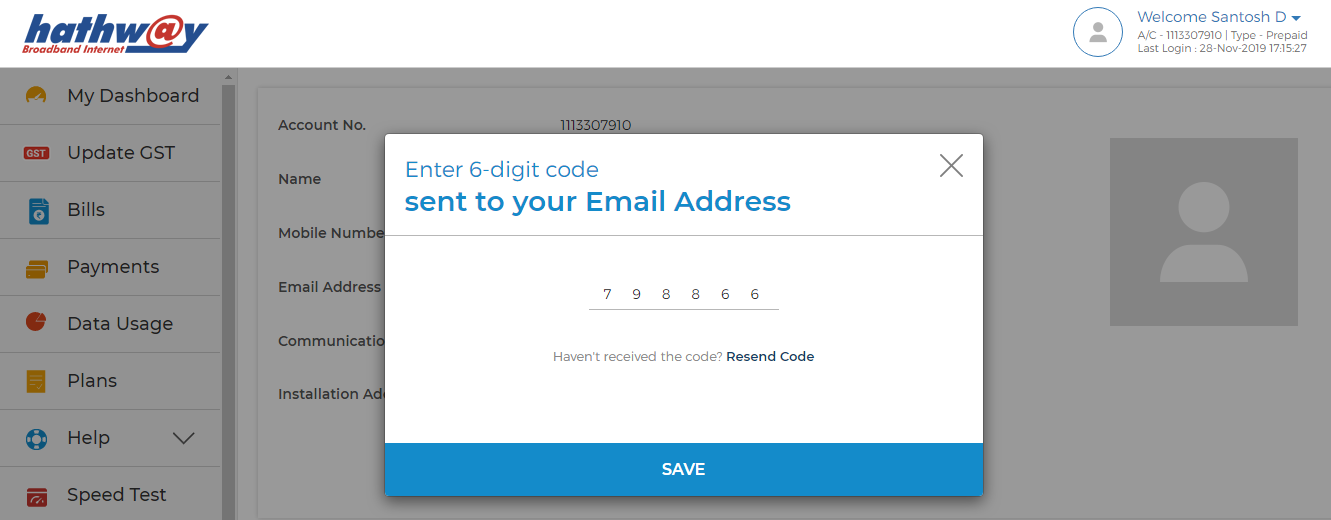
- Click on the “ Change Email id ” at the bottom.
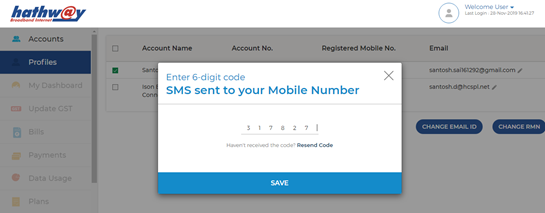
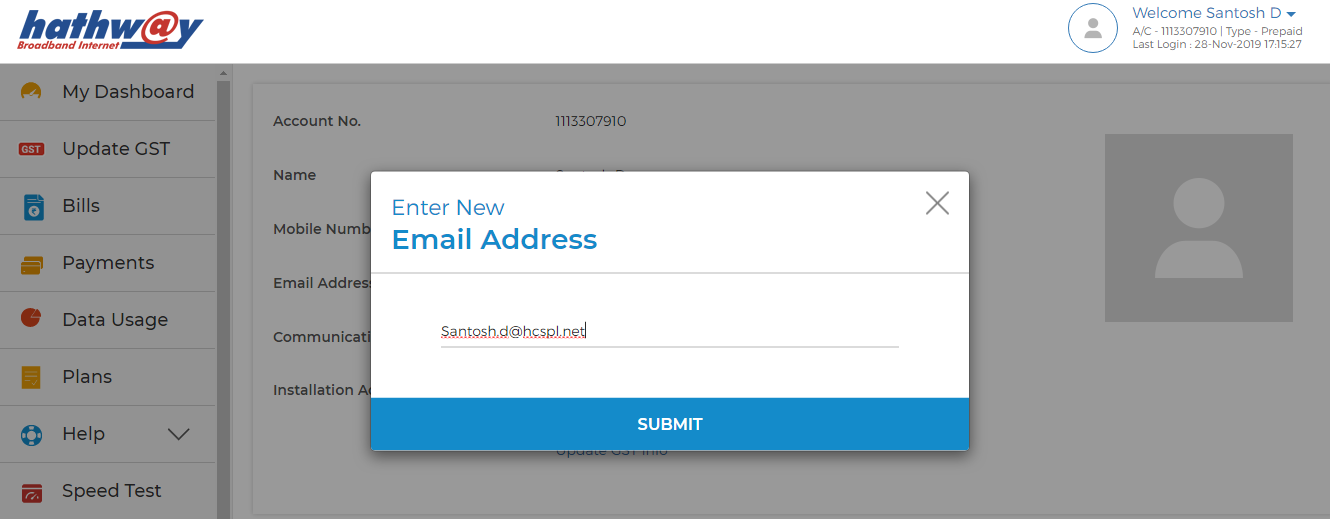
- Enter your new Email id.
- Enter the OTP sent to your Email id.
- Go to the “Profile” option and check the new mail id
If you have multiple Accounts then select the concern Account from the List .
HATHWAY BROADBAND TECHNICAL FAQ
HOW TO CHANGE WI-FI CREDENTIALS ( WIFI NAME / PASSWORD )
- Identify the Wifi Device Installed at your place . The Device name will be on the front side of the Device and the Model No will be mentioned at the Back Side.
- Choose the Device Type from the List mentioned below
- Device Make : ZTE Model No F660 Model No F602W Model No 612W
- Device Make : Genexis Model No Platinum 4410
- Router Make : TENDA Model No AC1200 A9
- Router Make : TP LINK Model No TL WR850N
- Router Make : DLINK Model No DIR615 , Model No DIR842
INTEGRATED WI-FI DEVICES
WI-FI ROUTERS
- Reset your ZTE ONU by pressing the “Reset” button with a pointed object for 10 seconds.
- The “Reset” button will be next to the “Power” button.
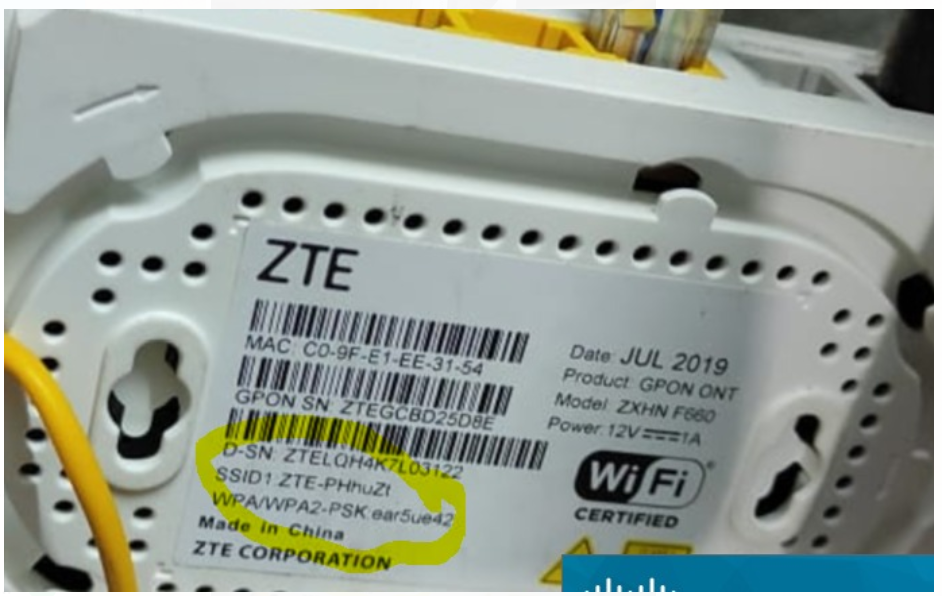
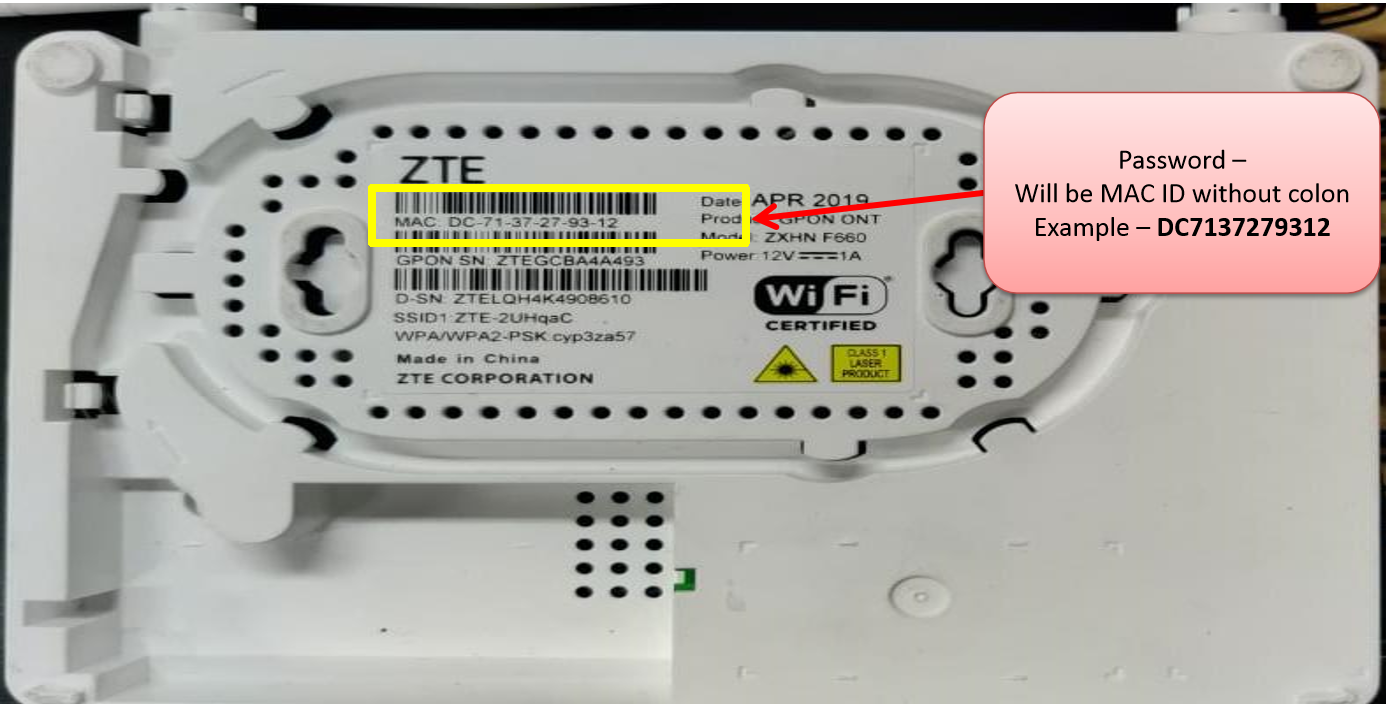
- Note down the Default WI-Fi user id and password mentioned at the back of the ONU.
- Click on the Wi-fi option in your system , chose the default user id as mentioned in your device.
- Type the default password mentioned in your device and connect.
- Once you are connected you may re-configure your Wi-Fi credentials by following the instructions mentioned below
- Connect to Wi – fi.
- Open the web browser (Internet Explorer/Mozilla Firefox) Type in the address bar 192.168.1.1.
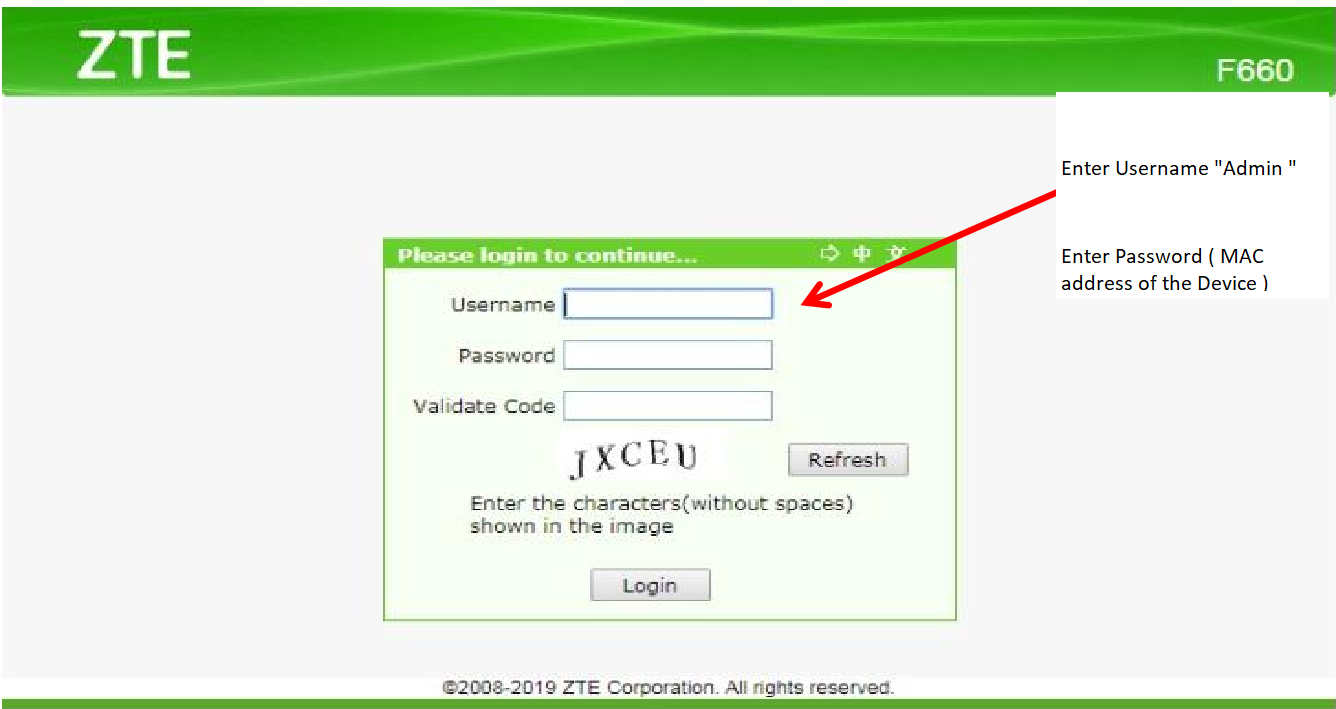
- ZTE page will open.
- The default Username of the device will be “Admin”.
- The default Password will be MAC ID which will be on the back side of the Device
- Password will be a 12 digit no without any special characters . The password for the below device will be DC7137279312.
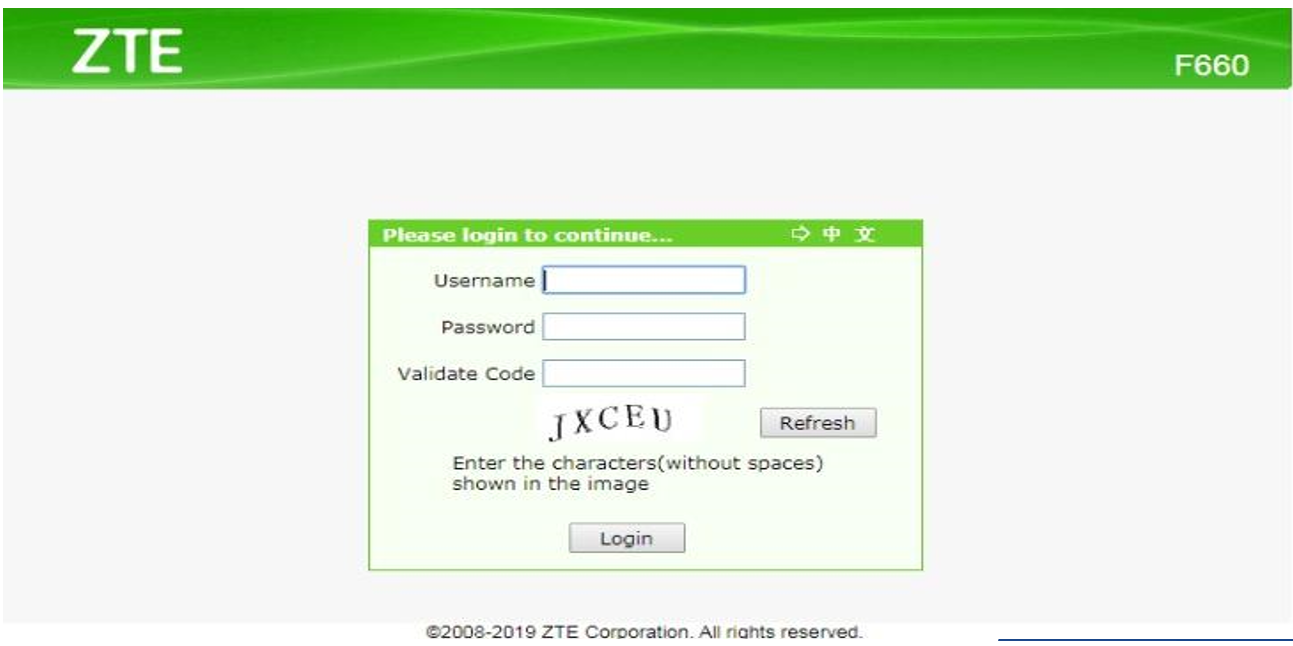
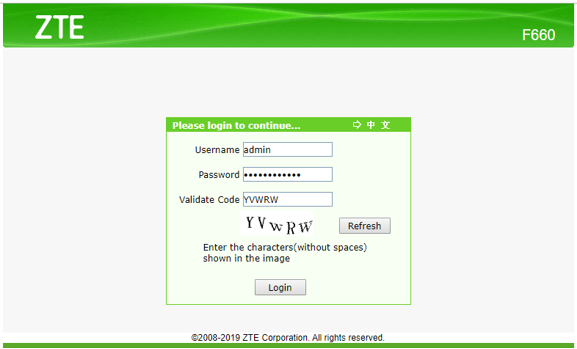
- Enter User Name - “Admin”.
- Password (MAC ID with out Special Characters )
- Enter the Captcha as mentioned below.
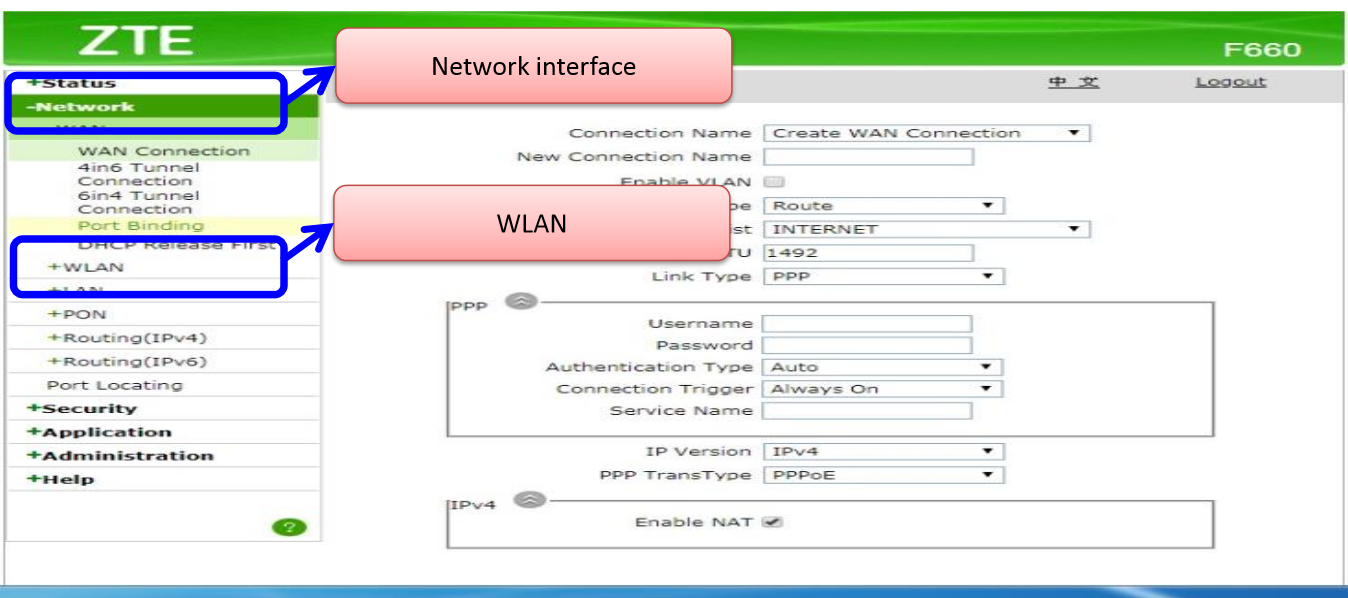
- Click on Network Interface.
- Click on WLAN option.
- Enter User Name - “Admin”.
- Password (MAC ID with out Special Characters )
- Enter the Captcha as mentioned below.
- Click on Network Interface.
- Click on WLAN option.
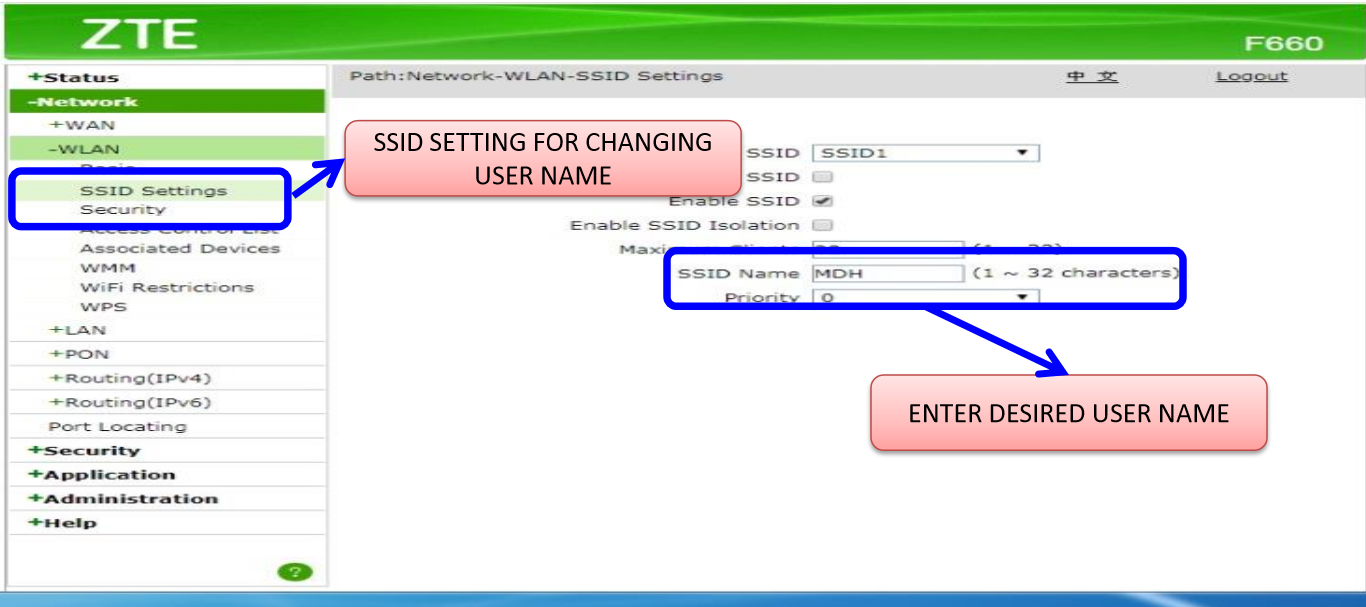
- To set your Wi-Fi name ,Click on “SSID Settings”
- Type your desired Wi-Fi name in the option provided as “SSID Name”.
- Your Wi-Fi name is configured . Confirm that the “Hide SSID” option is not checked . This will hide your Wi-Fi from all connected devices.
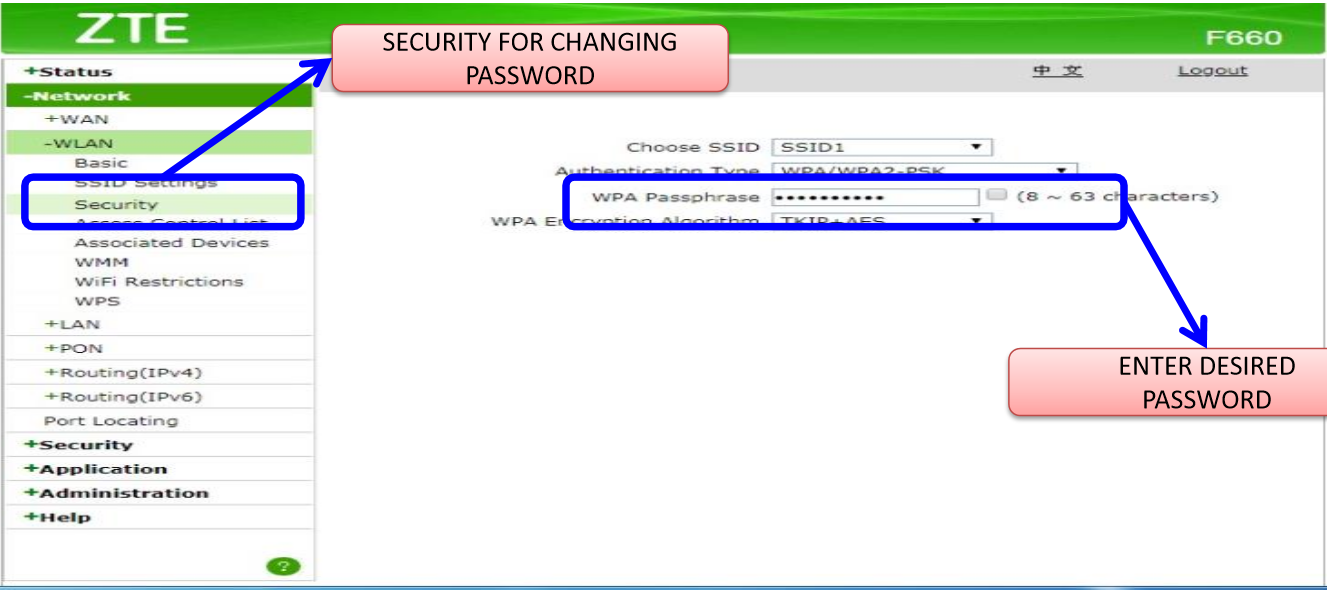
- To set your Password , click on “Security” under “SSID Settings”.
- Go to “WPA Passphrase “ option mentioned on the right . Enter your desired password . Your password length has to be between 8 to 63 characters with at-least 1 Special Character & 1 Upper Case . Click on “Submit” to save your settings.
- Connect to Wi – fi.
- Open the web browser (Internet Explorer/Mozilla Firefox) Type in the address bar 192.168.1.1.
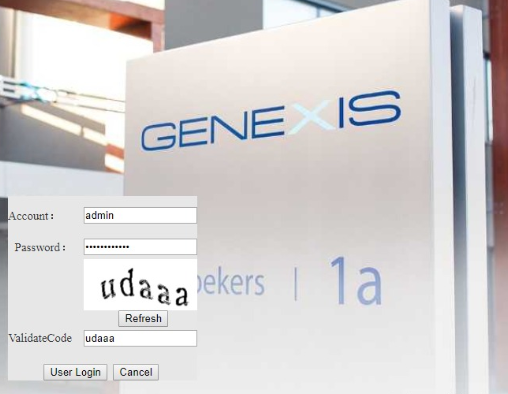
- GENEXIS page will open
- The default Username of the device will be “Admin”
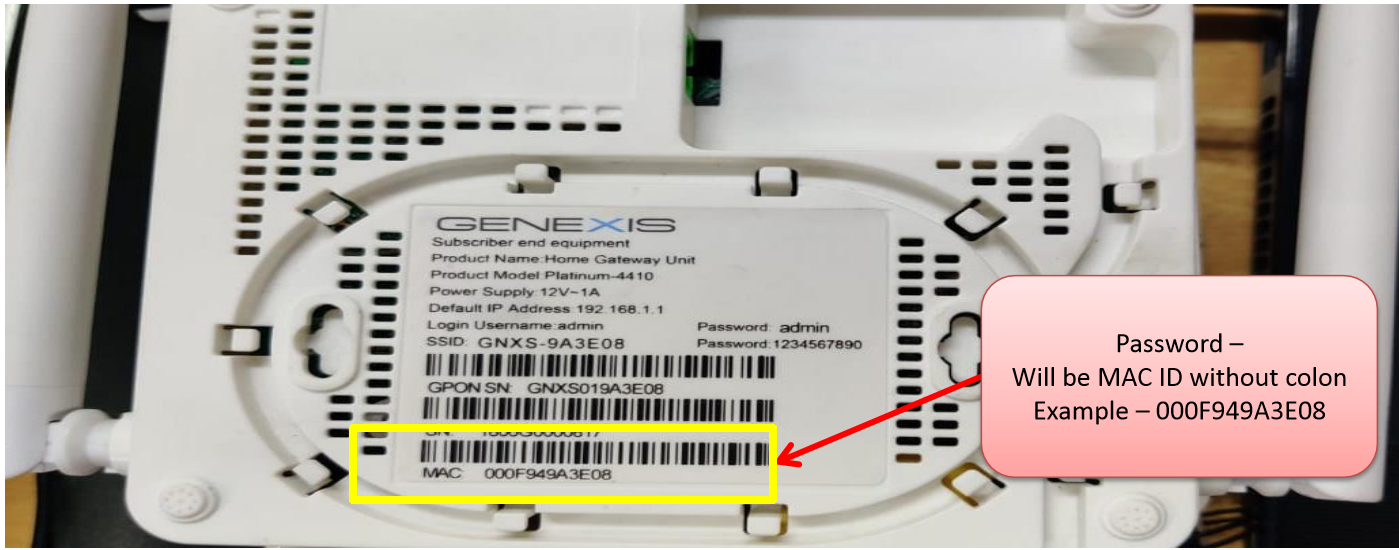
- The default Password will be MAC ID which will be on the back side of the Device.
- Password will be a 12 digit no without any special characters . The password for the below device will be 000F949A3E08.
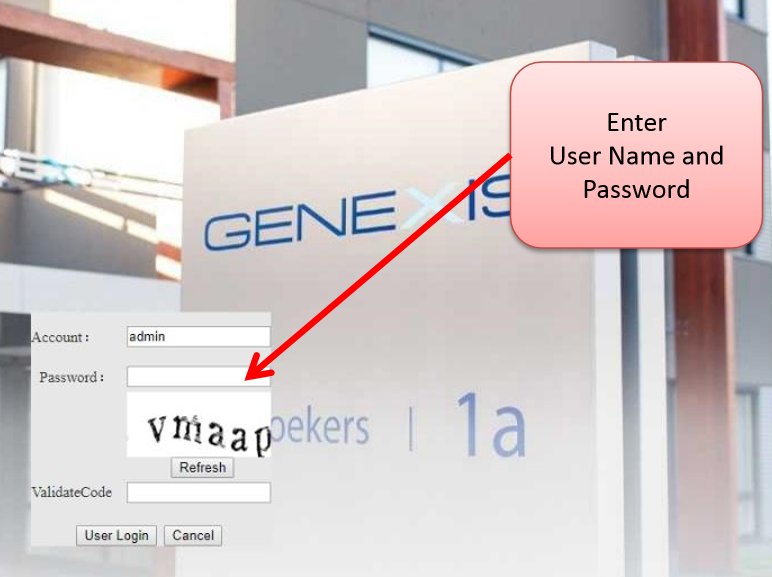
- Enter User Name - “Admin”
- Password (MAC ID with out Special Characters )
- Enter the Captcha as mentioned below.
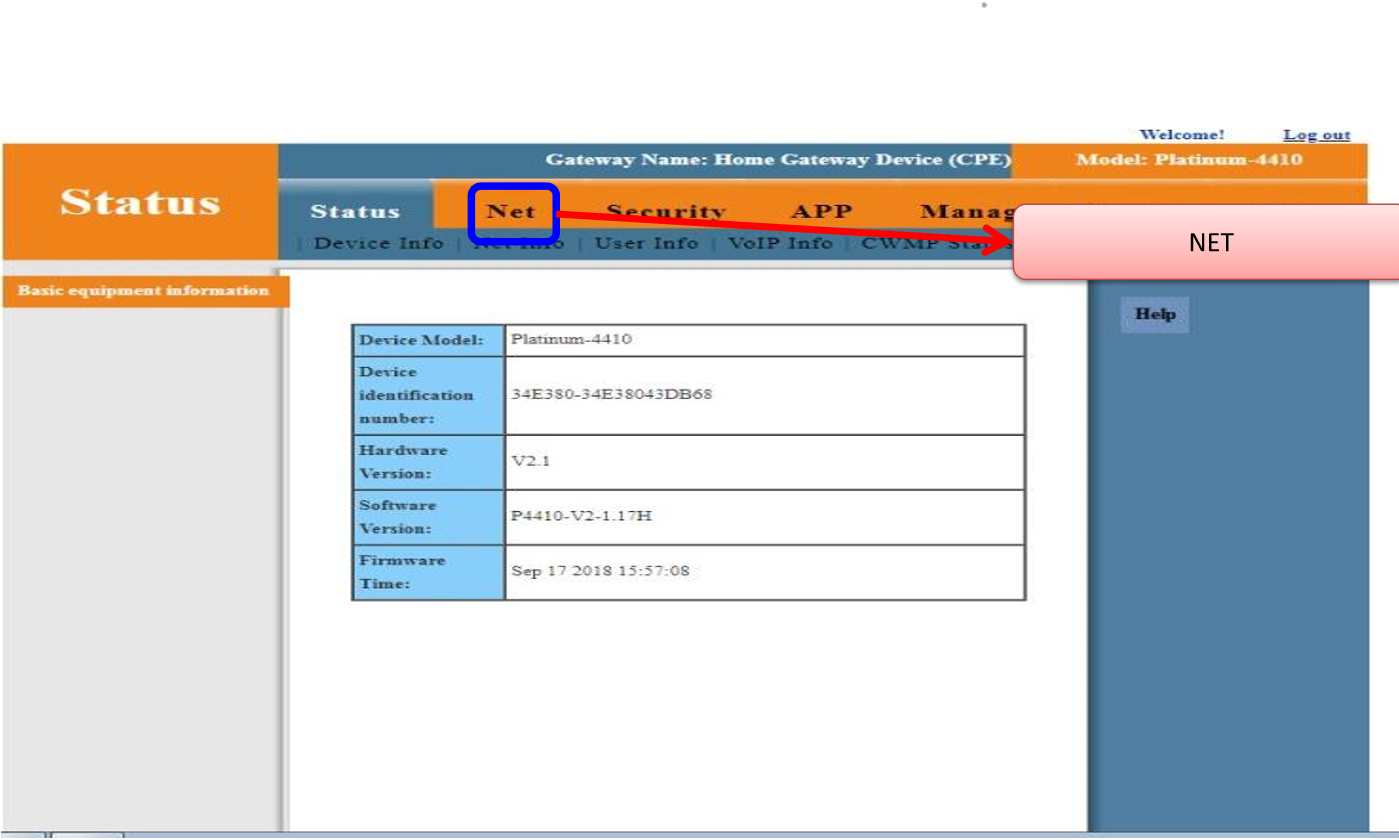
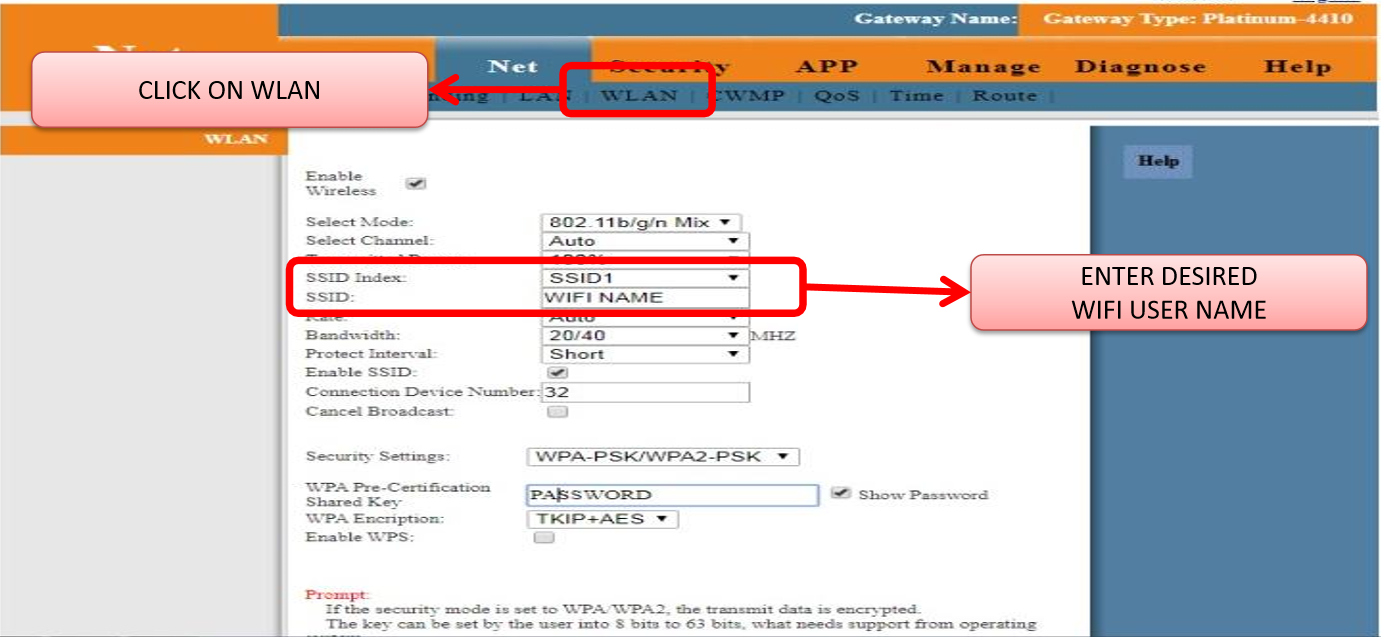
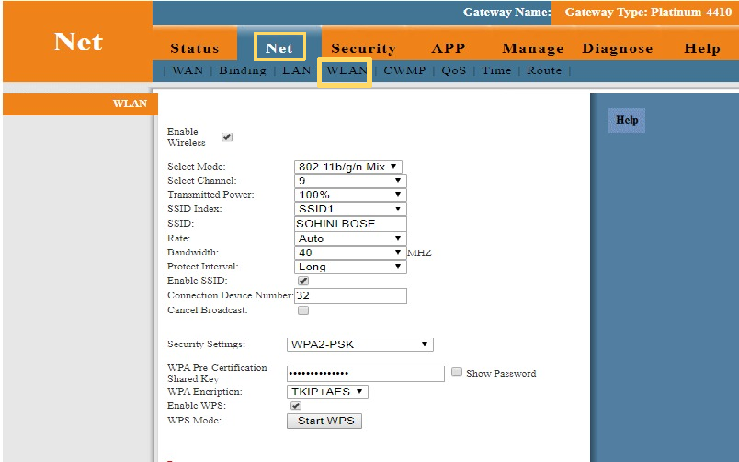
- Click on the Tab “Net” on the Top of the Page
- Click on the “LAN” option on the Top.
- Go down to the “SSID” option mentioned below.
- Type your desired WI-Fi Name in the box next to it.
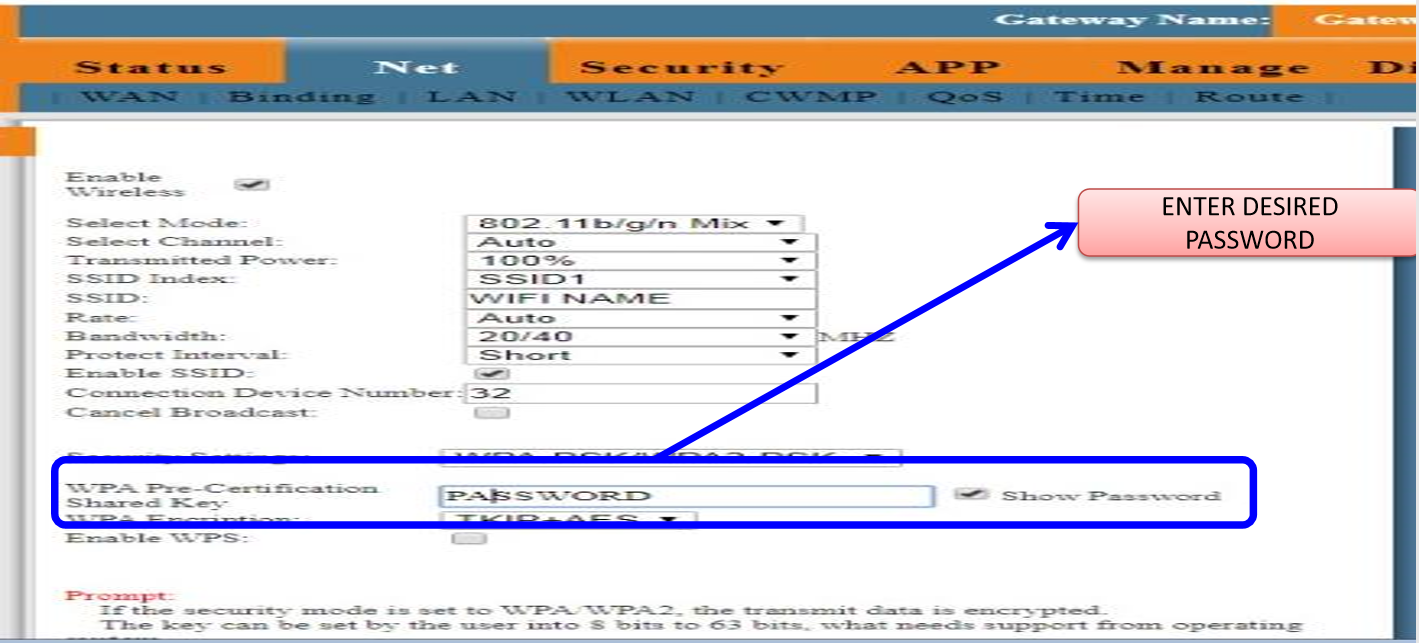
- To change the password go to the option “WPA Pre-Certification Shared Key”
- Please enter your desired password in the Box given . Your password length has to be between 8 to 63 characters with at-least 1 Special Character & 1 Upper Case . Click on “Submit” to save your settings.

- Connect to Wi – fi.
- Open the web browser (Internet Explorer/Mozilla Firefox) . Type in the address bar 192.168.0.1.
- TENDA WIFI ROUTER page will open
- Please enter your current password in the box provided for the same and click on Login
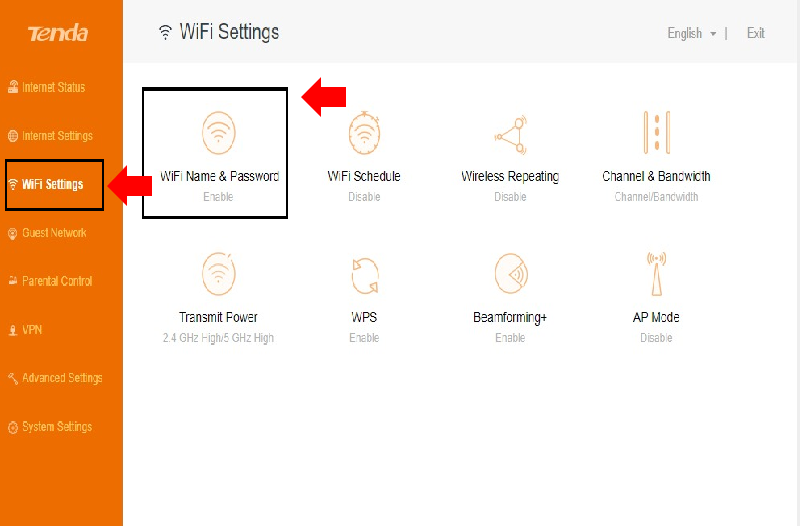
- Click on “Wifi Settings” on the left hand side of the page.
- Select “Wifi Name & Password” option.
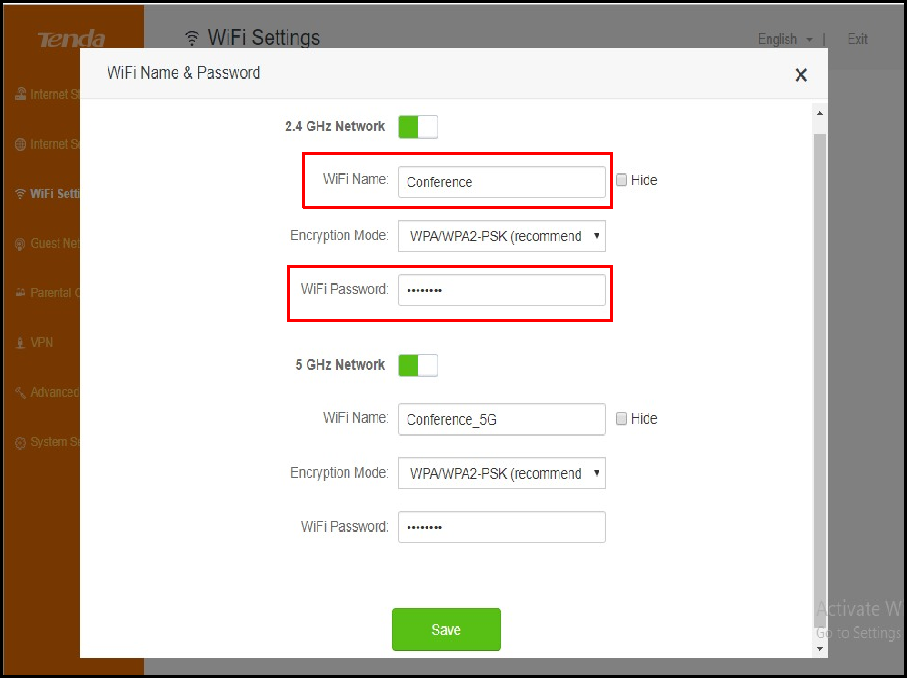
- Type your desired Wi-fi name in the Box next to “WIFI Name”
- Select the Encryption Mode as WPA/WPA2-PSK (recommended) .
- Type your desired Wi-Fi password in the Box next to “WiFi Password “ (for better security password should contact one upper case letter, one special character, one numeric number
- Click on “Save” button once the changes are done.
- Note: For 2.4GHz and 5GHz for same procedure for WiFi configuration.

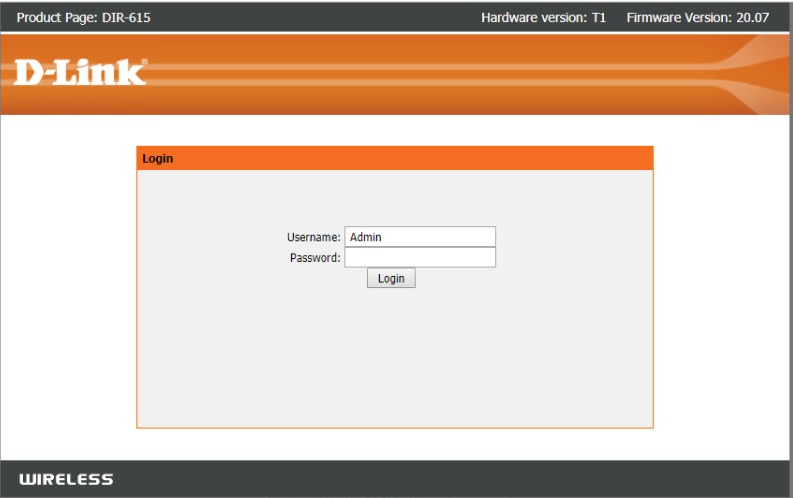
- Connect to Wi – fi . Open the web browser (Internet Explorer/Mozilla Firefox). Type in the address bar 192.168.0.1.
- Enter the default Username “Admin” or your current user name.
- Enter the default Password which may be the MAC id of the Device , mentioned at the Back side of the Device or your current password
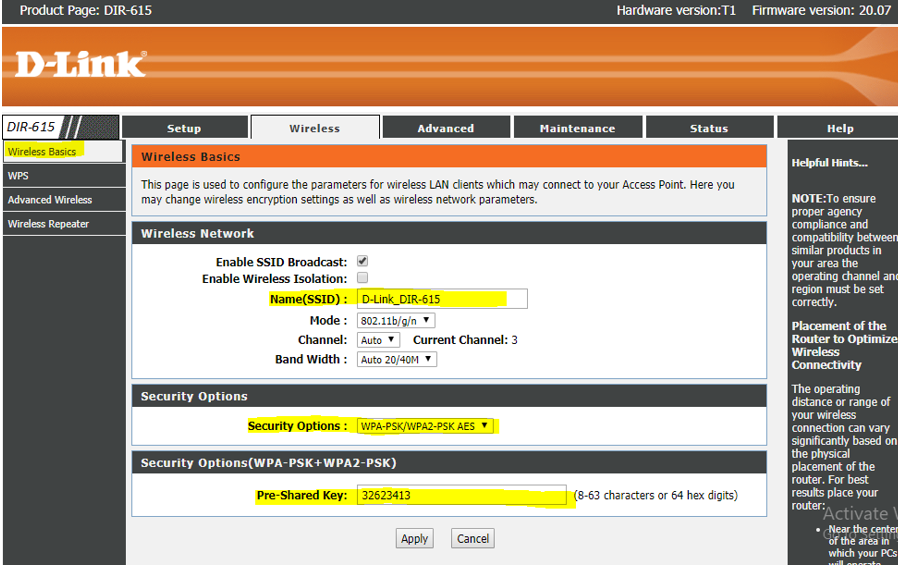
- Select “WIRELESS” on the Main Menu, select “Wireless Basics ”.
- Enter your preferred Wi-Fi name in the Box next to “Name ( SSID )”
- Enter your Preferred Password in the Box next to “Pre-Shared Key”.
- Click on “Apply” to save your configurations
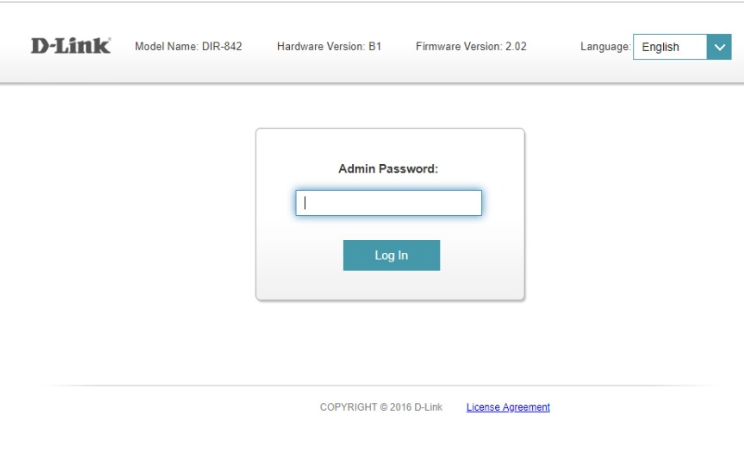
- Connect to Wi – fi . Open the web browser (Internet Explorer/Mozilla Firefox) . Type in the address bar 192.168.0.1.
- Enter your existing Wi-Fi password under “Admin Password” and click on Login.
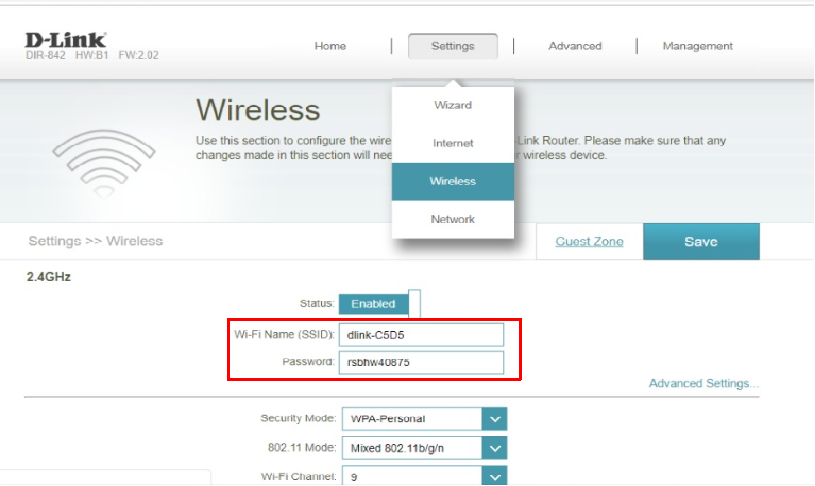
- Click on “Settings” on the Main Menu, select “Wireless”
- Enter your preferred Wi-Fi name in the Box next to “Wi-Fi Name ( SSID )”
- Enter your Preferred Password in the Box next to “Password”
- Click on “Save” to save your configurations
I AM NOT GETTING PROPER SPEED ON WIFI, WHAT SHOULD I DO ?
To improve Speed on Wi-Fi , follow the below steps :-
- Do a speed Test of your connection.
- If your speed Test results look lower than expected , then check the Wi-Fi Settings of your Device.
- If your speed Test results look lower than expected , then check the Wi-Fi Settings of your Device . Distance from your Wi-Fi Positioning of your Wi-Fi . Wi-Fi signal interference
- Check for multiple Devices connected to the same Wi-fi simultaneously.
- Do a health check of your PC / Laptop
To improve Speed on Wi-Fi , follow the below steps :-
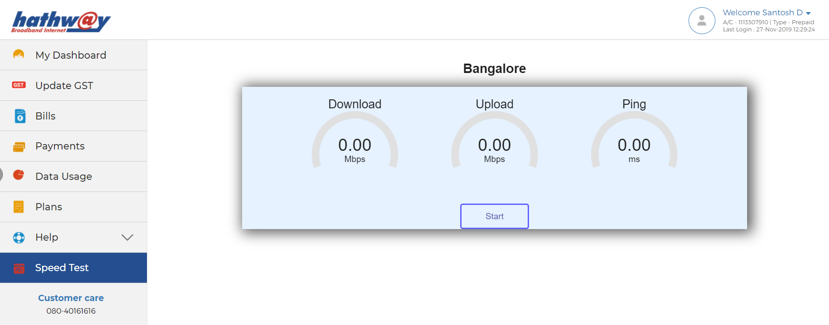
- Go to www.hathway.com , logg-in to Hathway Selfcare through your registered Mobile No.
- Click on the “Speed Test” option in the Left Menu You may also directly open www.speedtest.hathway.com to do Speed.
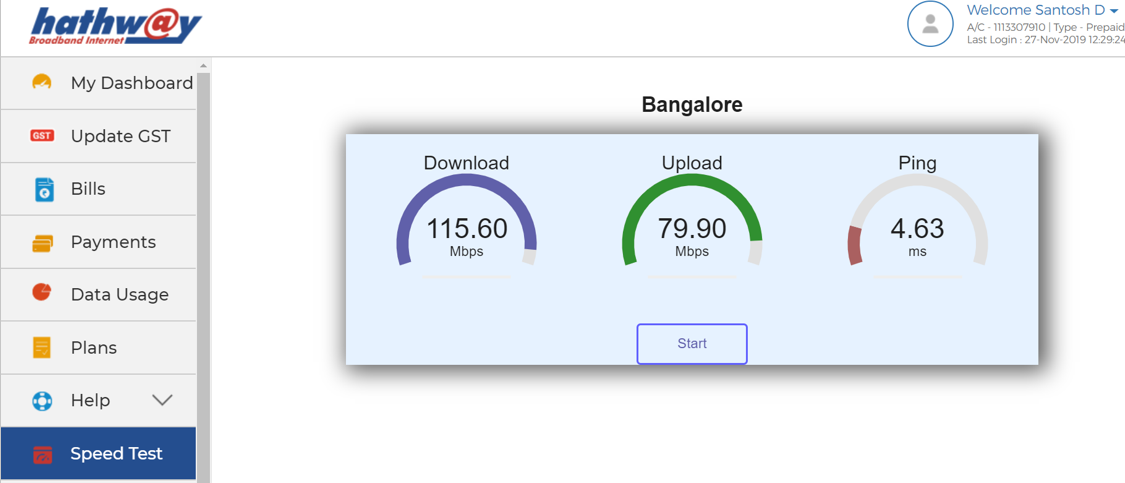
- Click on “Start” to commence the Speed Test.
- Please ensure that you are only using a single device at the time of doing a Speed Test . Disconnect all other devices from the Wi-Fi.
- The Speed Test is completed once the values are reflected for Download , Upload and Ping options
- Devices (phones, tablets, PCs, etc…) can have very different Wi-Fi and cellular radio capabilities. This means you might get one Speed test result on one device and a different result on another, even using the same provider.
- Speed Test results may be low if you’re running any ongoing downloads or other programs like video chat that might be hogging your bandwidth. Close those and test again.
- Speed test is measuring your real-time network connection, so tests taken within a few minutes of each other might vary a little based on network congestion and available bandwidth.

- Open web browser and enter the IP 192.168.1.1
- Enter the Default Username: “admin”
- Enter the Default Password: The MAC address of the Device (Mentioned on back of ONU)
- Password will be a 12 digit no without any special characters . For Example “DC7137279312”
- Validate Code: As shown in login page
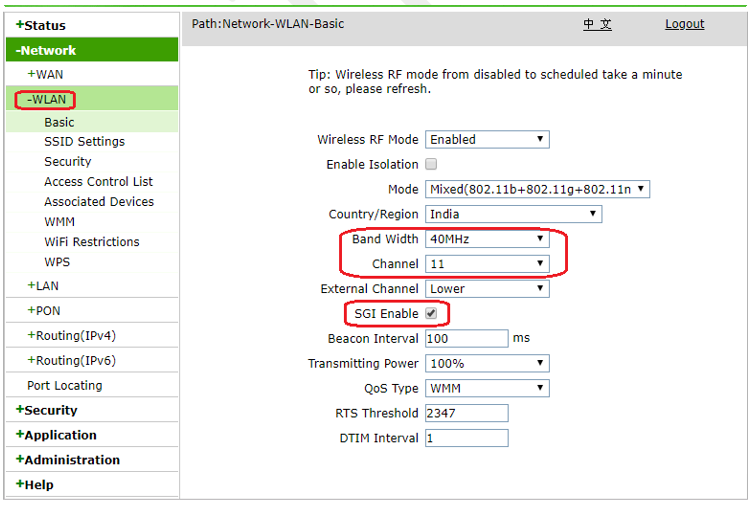
- Select “NETWORK” on the Main Menu
- Select “WLAN” in Sub Menu.
- Select Band width: 40MHz & Channel: 9 or 11
- Enable SGI : Enable . Click on “SUBMIT” If the Settings of your Device is already reflecting the same , then your device is already configured to deliver the best wifi speed . Pls follow the general Wifi guidelines
- Open web browser and enter the IP 192.168.1.1
- Enter the Default Username: “admin”
- Enter the Default Password: The MAC address of the Device (Mentioned on back of ONU) Password will be a 12 digit no without any special characters . For Example “DC7137279312”
- Validate Code: As shown in login page
- Select “Net” on the Main Menu
- Select “WLAN” in Sub Menu.
- Select Band width: 40MHz & Channel: 9 or 11
- Click on “SUBMIT” If the Settings of your Device is already reflecting the same , then your device is already configured to deliver the best wifi speed . Pls follow the general Wifi guidelines
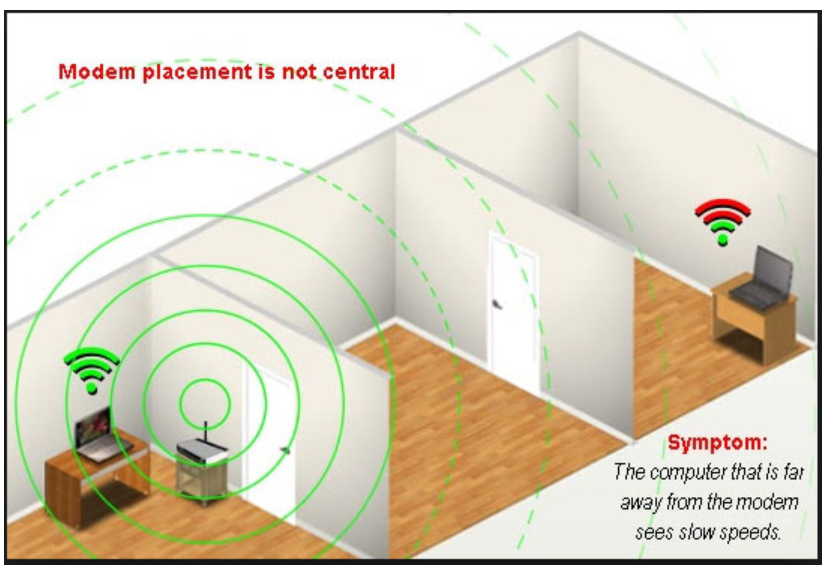
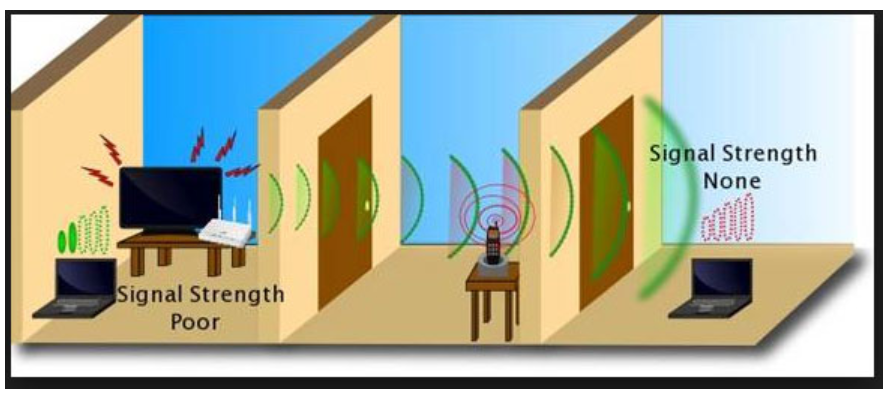
- Distance from your Wi-Fi The further you are from your router, the weaker the signal and the slower the connection – especially if your house has thick walls. Get closer for a better signal. Wood, plaster, and glass don't interfere much with wireless signals; brick, tile, and concrete can be more of a problem.
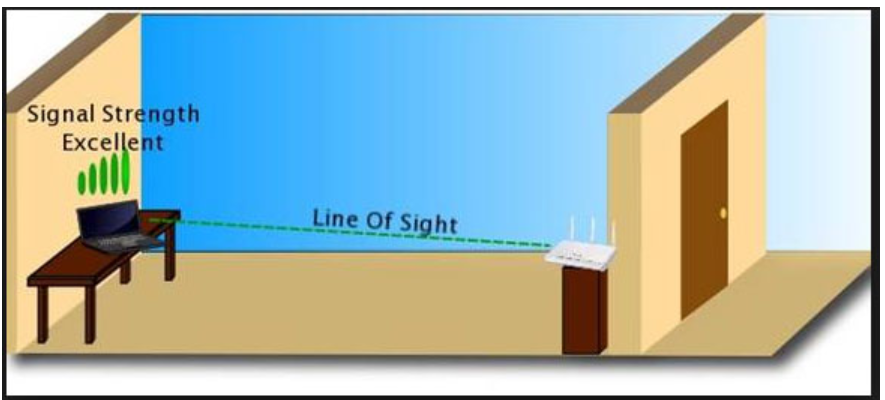
- Positioning of your Wi-Fi. Your signal comes from the front of the router, so make sure your router is facing in to your home. It shouldn’t be positioned on its side and the antenna should point upwards. Try placing your router on a table or shelf, rather than the floor and make sure it’s free of obstructions like furniture or books.
- Wi-fi signal interference It’s also a good idea to avoid electrical and signal interference. Keep your router away from things like microwaves, TVs, cordless phones, baby monitors and wireless keyboards.
Computers and other devices on a network must share a finite capacity of resources, and
that's true for wired and wireless (Wi-Fi) networks alike. However, the precise limits
depend on multiple factors. Every device connected to your wireless network takes a bit more
of the bandwidth Your router doesn't think in terms of priorities. Instead, it thinks in
terms of where capacity is needed and where it's being used the most. It will pull
indiscriminately in an attempt to keep all devices working at some level. On home networks,
all devices normally share a single internet connection. The performance will start to
degrade as more devices join the network and start using it simultaneously. Even just a
handful of active devices streaming video or downloading files can quickly max out a shared
internet link. A Wi-Fi router rated at 300 Mbps with 100 devices connected, for example, can
only offer on average 3 Mbps to each of them (300/100=3).
- Un-install unused programs: To remove these click "Start" then go to "Control Panel" then click "Programs and Features" and scroll through the list, uninstalling the ones you never use.
- Delete Temporary Files: To get rid of all this clutter open "My Computer", select your main drive, click the "Windows" folder then open the folder inside that called "Temp". Use your mouse to right-click on the folder, and in the "View" options, choose "Details". Once this is done, select all the files that are older than the current date and press the delete key. Then go to the Recycle Bin on your desktop and empty it.
- Stop un-necessary Start ups: Whenever you switch on your PC some programs will automatically start to run in the background which will use your computer's memory and make it slow . To disable these programs click Start and type "Run". In the box that appears type "msconfig" and a box will appear, at the top click the "Startup" tab listing all the applications that run when your computer starts up. Either manually untick the ones that are unnecessary or click "disable all", but be sure to keep vital things like antivirus going.
- Get more RAM: When you try to work on several applications at once, such as email, internet, and word your computer may slow down . This is because you don't have enough RAM. This is memory used by your PC to run the programs and can be easily upgraded
- Get your software up to date Using older versions of a browser can seriously slow things down – especially if you’re looking at pages with lots of pictures or watching videos Upgrading to the latest version of the browser you use , like – Google Chrome, Mozilla Firefox, Safari or Internet Explorer - may really speed things up
- Upgrade to a faster Network Adaptor: Your device’s network adapter should comply with the latest 802.11ac WiFi standard. Any network adapter that uses an older protocol (802.11n, 802.11a, 802.11b, or 802.11g) is not able to take advantage of very high speeds
WHAT ARE THE SAFETY MEASURES THAT MUST BE TAKEN ?
- In case of a thunder and lightening , unplug the Device from the main power supply and from the PC set or other equipment.
- Never remove the product cover. Should the product fail, contact the Customer Service to arrange repair or service.
- Never allow anyone to push anything into holes, slots or any other opening in the case.
- Do not block the ventilation slots; never stand it on soft furnishings or carpets. Leave 7cm to 10cm around the appliance to ensure that proper ventilation gets to it.
- Do not put anything on it which might spill or drip into it. If an object or liquid enters inside the Cable Modem, unplug it immediately and contact the Customer Service.
- Do not store the Device in excessively hot, cold or damp conditions. It is intended to operate at an ambient temperature of less than 35 degrees Celsius and a maximum humidity level of 70%.
- Leave the mains socket accessible so that you can unplug the set quickly.
- Only the power adapter supplied with the product has to be used. Ensure your house / building has proper earthing.
- Most of our devices are designed to operate in the rated voltage 110 ~ 240 VAC. If you are in any doubt about the mains lead, the plug or connection, please consult the Customer Service 10. Do not store your appliance on its side.
- To clean the appliance, use a dry, clean soft cloth with no cleaning solvent or abrasive products. Clean the ventilation openings regularly.
DO’S AND DON’T’S
DO's
- Always connect your Hathway device to your UPS to enjoy seamless connectivity during power failures .
- Always connect the Hathway Devices to Power Strip with Spike Suppressor , for the safety of the Device and your computer during power surge s .
- Always place the Wi-Fi device in a central location . Ideally, it should be within sight of wherever you sit and use the Internet most.
- Set up you’re your Wi-Fi device on a height . Mounting the router to a wall or setting it on a high shelf can give you a better signal.
- Position the Wi-Fi antennas upward for a better horizontal reach, or sideways for vertical reach
- Most importantly Switch Off your Wi-Fi Device when not in use.
DONT's
- Do not frequently move your device since this may result in loose connectivity.
- Do not surround the Wi-Fi Device with metal objects.
- Do not keep the Wi-Fi Device near a Microwave , cordless phones, video cameras , Bluetooth radios.
- Do not place your Wi-Fi Device next to a thick wall.
- Do not use easy and predictable Wi-Fi names (like WiFi001, homewifi111, etc.) which may cause security issues.
- Do not use the Default Wi-Fi password . Every router has a default administration password like “admin”, “password”, “1234”, etc. Please use your own customized password.
- Do not disable Wi-Fi encryptions . If your Wi-Fi device has no password, it’s just like your house has no doors.